Online Activation
Automate activation with a PHP server so users can activate over the internet.
You’ve built a powerful Excel application with VBA macros, and now you want to distribute it without exposing your source code. In this tutorial, you’ll walk through the complete workflow: compiling your VBA logic into a protected DLL, wiring it up to Excel through the auto-generated VBA Bridge, and optionally adding activation keys with hardware locking.
What you’ll build:
Time needed: 15-20 minutes
Start by opening your Excel file in VBA Padlock. This creates a project that will hold your compiled code, licensing settings, and build configuration.
Launch VBA Padlock
Click “Open Office File” in the ribbon (or press Ctrl+O)
Select your Excel workbook or add-in (.xlsm or .xlam file) — for this tutorial, we’ll use a file called MyExcelApp.xlsm
VBA Padlock analyzes your file and displays the Project Info panel
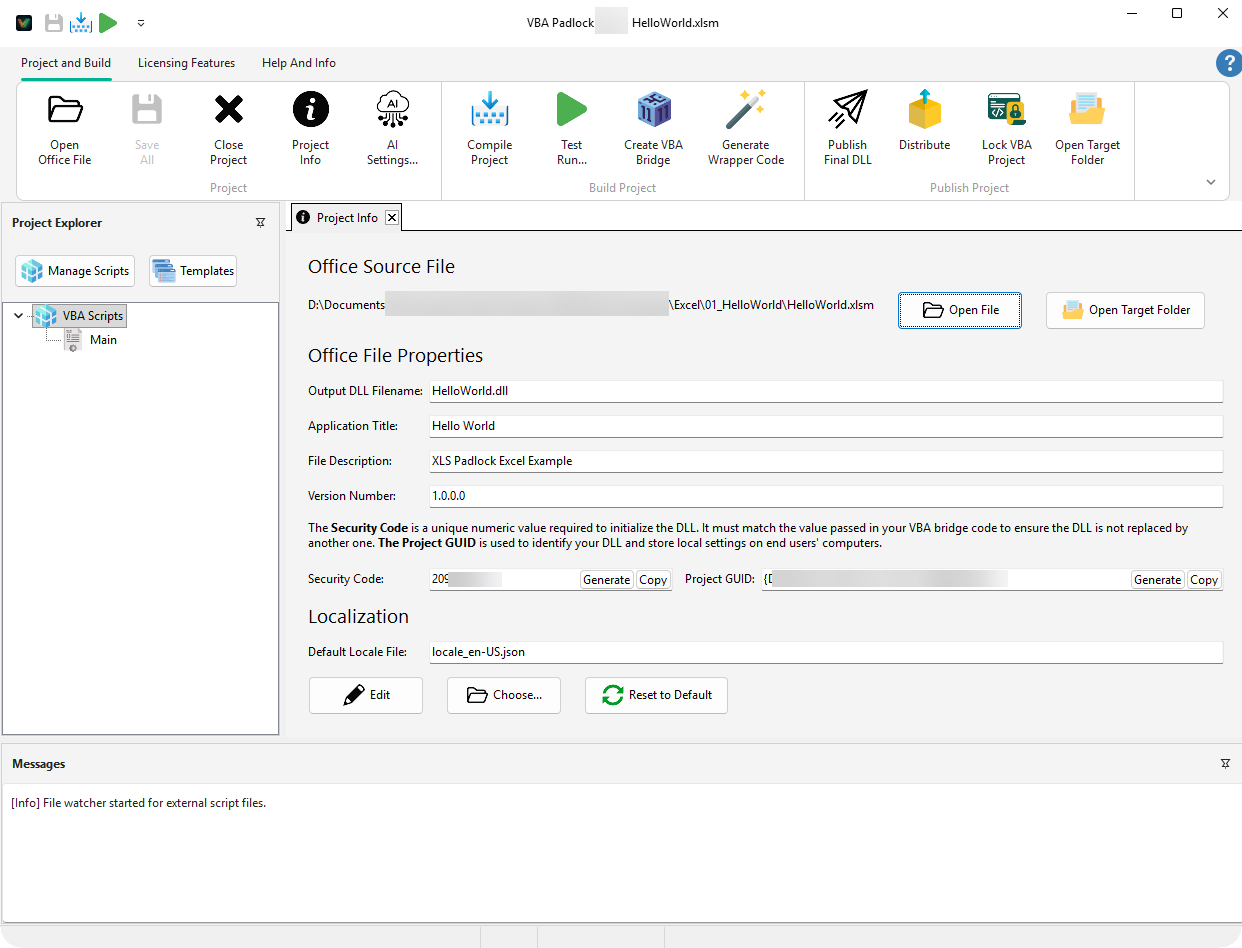
In the Project Info panel, fill in these fields:
| Field | Example Value | Purpose |
|---|---|---|
| DLL Name | MyExcelApp | Base name for all output DLL files |
| Application Title | My Excel Application | Shown in activation dialogs and title bars |
| Version Number | 1.0.0.0 | Your application’s version |
| File Description | Protected Excel VBA Macros | Appears in Windows file properties |
Now switch to the Code Editor in VBA Padlock. This is where you write the VBA code that will be compiled into the DLL. The code you write here will no longer be visible as plain-text VBA — it runs inside the protected DLL.
Here is an example script that demonstrates the key patterns — subs, functions with parameters, reading/writing cells, and interacting with the workbook:
Sub HelloWorld()    On Error Resume Next    MsgBox "Hello from VBA Padlock!", vbInformation, "MyExcelApp"End Sub
Function Greet(UserName)    If Len(Trim(UserName)) = 0 Then        Greet = "Hello, Anonymous!"    Else        Greet = "Hello, " & Trim(UserName) & "!"    End IfEnd Function
Sub ShowWorkbookInfo()    Dim Info, WB    Set WB = Application.ActiveWorkbook    Info = "Workbook Information" & Chr(13) & Chr(13)    Info = Info & "Name: " & WB.Name & Chr(13)    Info = Info & "Path: " & WB.Path & Chr(13)    Info = Info & "Sheets: " & WB.Sheets.Count    MsgBox Info, vbInformation, "Workbook Info"End Sub
Sub WriteToCell(CellAddress, Value)    Application.ActiveSheet.Range(CellAddress).Value = ValueEnd Sub
Function ReadFromCell(CellAddress)    ReadFromCell = Application.ActiveSheet.Range(CellAddress).ValueEnd Function
Function CalculateDiscount(Price, DiscountRate)    If DiscountRate < 0 Or DiscountRate > 1 Then        CalculateDiscount = Price    Else        CalculateDiscount = Price * (1 - DiscountRate)    End IfEnd Function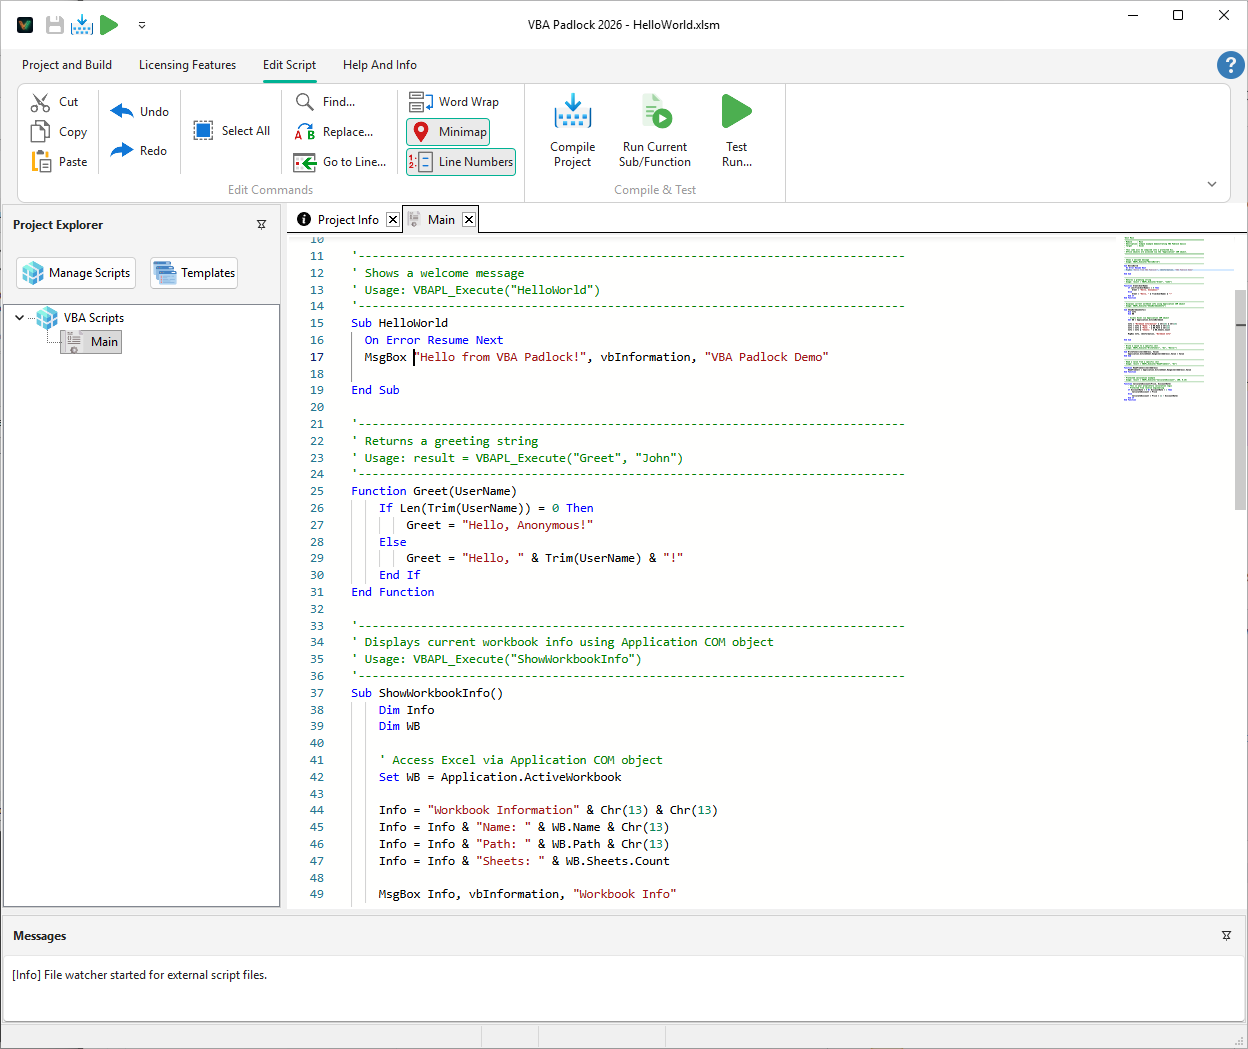
Type or paste this code into the VBA Padlock Code Editor. You can adapt it to your own application — the important thing is that each Sub or Function you define here becomes callable from Excel through VBAPL_Execute.
Time to build the protected DLL.
Click “Publish Final DLL” in the ribbon (Project and Build tab)
Click “Build Final DLL Files” in the Publish dialog
VBA Padlock will:
When the build completes, you’ll see a success message. Three DLL files are created in the bin\ subfolder next to your Excel workbook:
MyExcelApp\├── MyExcelApp.xlsm└── bin\ ├── MyExcelApprun32.dll (32-bit runtime) ├── MyExcelApprun64.dll (64-bit runtime) └── MyExcelApp.dll (your compiled code - satellite DLL)The VBA Bridge is a standard VBA module that VBA Padlock generates and injects into your Excel workbook. It contains all the Declare statements and wrapper functions (VBAPL_Execute, VBAPL_IsLicenseValid, etc.) that let your Excel VBA code communicate with the compiled DLL.
You do not write the bridge code manually — VBA Padlock creates it for you.
Open your MyExcelApp.xlsm file in Excel (enable macros when prompted)
Go back to VBA Padlock and click “Create VBA Bridge” in the ribbon
Click “Inject Into Office”
VBA Padlock inserts a new module named VBADLLBridge (or similar) into your workbook’s VBA project. This module contains all the VBAPL_* functions.
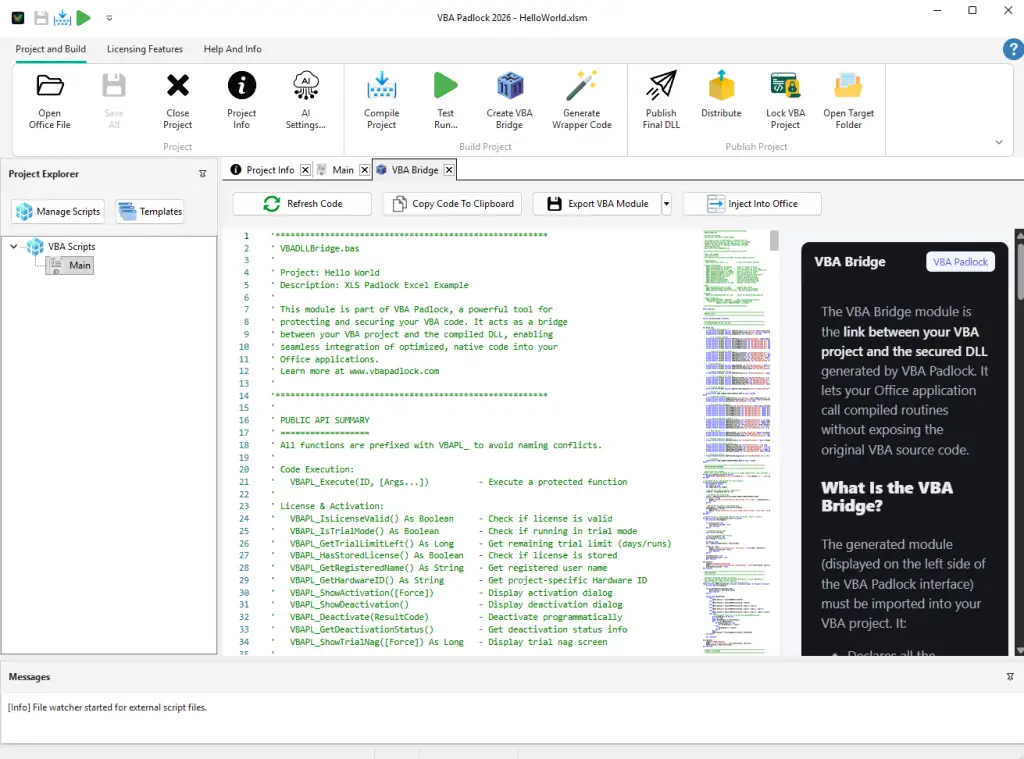
Open the VBA Editor (Alt+F11) in Excel and you’ll see the new bridge module. It includes functions such as:
VBAPL_Execute — call any Sub or Function compiled in the DLLVBAPL_IsLicenseValid — check whether the application is activatedVBAPL_ShowActivation — display the activation dialogVBAPL_GetHardwareID — retrieve the user’s hardware identifierVBAPL_IsTrialMode — check if running in trial modeNow that the VBA Bridge is in place, you can call your compiled functions from regular Excel VBA code. The key function is VBAPL_Execute — you pass it the name of a Sub or Function (as a string), followed by any arguments.
In the VBA Editor, insert a new standard module (for example, Module1) and add your caller macros:
Sub Demo_HelloWorld()    Call VBAPL_Execute("HelloWorld")End Sub
Sub Demo_Greet()    Dim UserName As String, result As Variant    UserName = InputBox("Enter your name:", "Greet Demo")    If Len(UserName) > 0 Then        result = VBAPL_Execute("Greet", UserName)        MsgBox result, vbInformation, "Greeting"    End IfEnd Sub
Sub Demo_WorkbookInfo()    Call VBAPL_Execute("ShowWorkbookInfo")End Sub
Sub Demo_WriteToCell()    Call VBAPL_Execute("WriteToCell", "A1", "Hello from DLL!")    MsgBox "Value written to A1", vbInformationEnd Sub
Sub Demo_ReadFromCell()    Dim Value As Variant    Value = VBAPL_Execute("ReadFromCell", "A1")    MsgBox "Value in A1: " & CStr(Value), vbInformationEnd Sub
Sub Demo_CalculateDiscount()    Dim Price As Double, DiscountRate As Double, FinalPrice As Variant    Price = 100: DiscountRate = 0.15    FinalPrice = VBAPL_Execute("CalculateDiscount", Price, DiscountRate)    MsgBox "Original: $" & Format(Price, "0.00") & vbCrLf & _           "Discount: " & Format(DiscountRate * 100, "0") & "%" & vbCrLf & _           "Final: $" & Format(FinalPrice, "0.00"), vbInformation, "Discount Calculator"End Sub
Notice the pattern:
Call VBAPL_Execute("SubName", arg1, arg2, ...)result = VBAPL_Execute("FunctionName", arg1, arg2, ...)The first argument is always the name of the compiled Sub or Function as a string. Any additional arguments are passed through to that Sub or Function.
Save the workbook.
Let’s verify everything works end to end.
Close and reopen MyExcelApp.xlsm in Excel
Enable macros when prompted (click “Enable Content”)
Press Alt+F8 to open the Macro dialog
Select Demo_CalculateDiscount and click Run
You should see a message box displaying the calculation result:
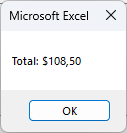

If all the demos work, your code is successfully compiled into the DLL and running through the VBA Bridge.
If you want to require an activation key before your application runs, follow this step. If you’re just protecting your code without licensing, you can skip ahead to Step 8.
Switch to the “Licensing Features” tab in the VBA Padlock ribbon
Click “Activation Settings”
Check “Activation key is required to run the protected VBA application”
Click OK
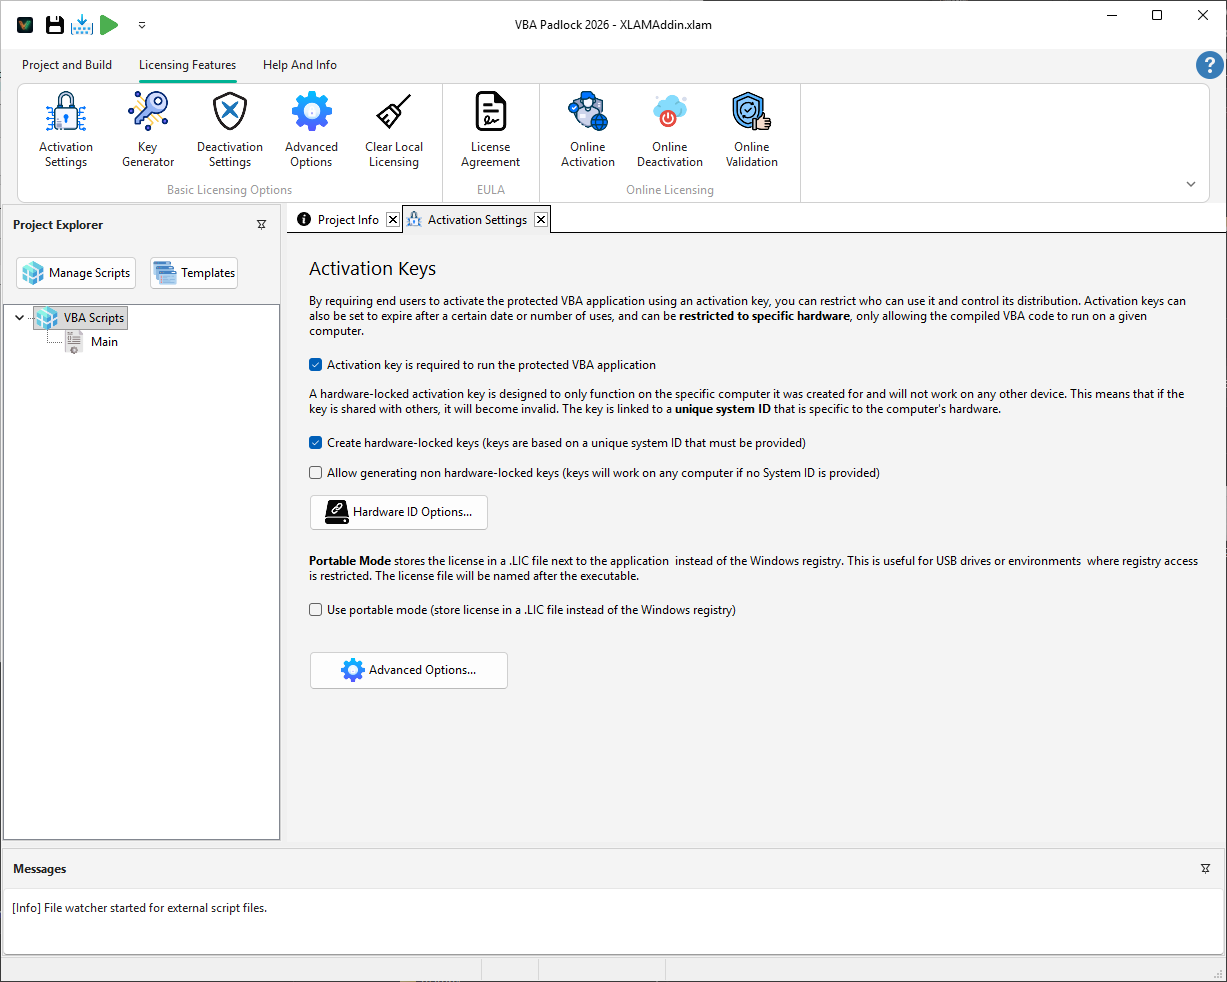
Hardware locking ties each license key to a specific computer, preventing key sharing.
In the Activation Settings dialog, check “Create hardware-locked keys”
Click “Hardware ID Options…” to choose which hardware components to include:
Click OK
After changing licensing settings, you need to rebuild the DLL:
Go back to the “Project and Build” tab
Click “Publish Final DLL” then “Build Final DLL Files”
The new DLL now enforces activation
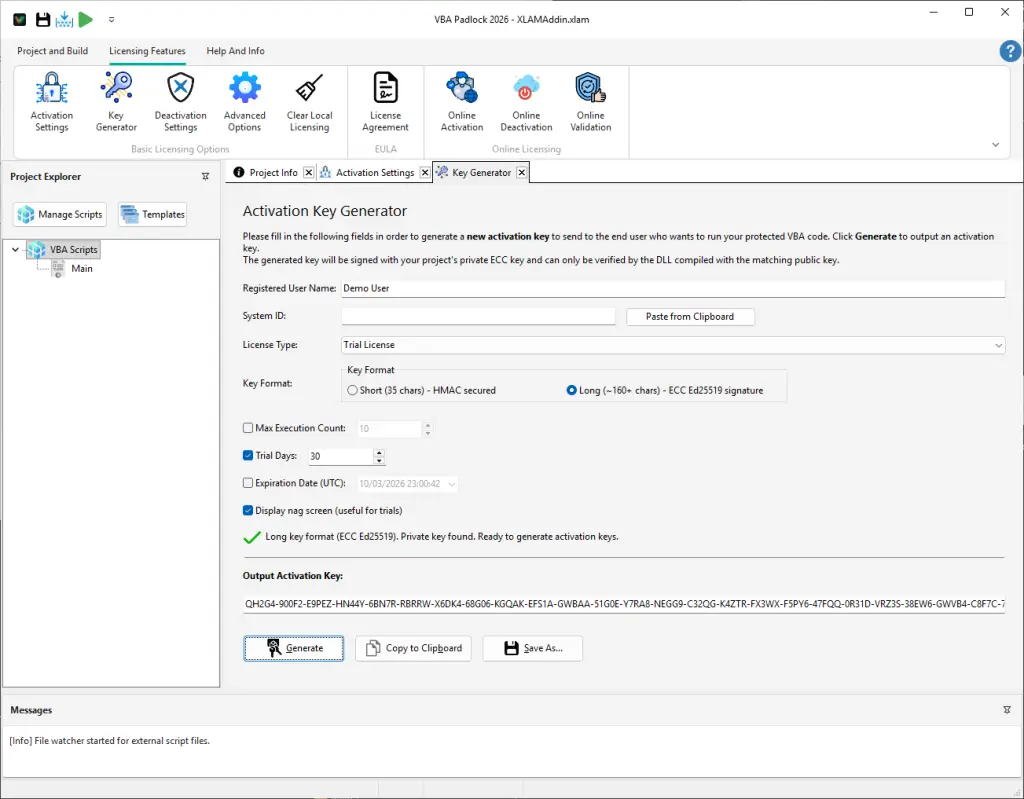
To test the activation flow on your own computer:
Click “Key Generator” in the Licensing Features ribbon
The Hardware ID field shows your computer’s ID
Click “Generate Key”
Copy the generated key — you’ll enter it when testing
Update the Workbook_Open event in ThisWorkbook:
Private Sub Workbook_Open()    ' Check if the application is activated    If Not VBAPL_IsLicenseValid() Then        VBAPL_ShowActivation    End If
    ' After activation, the user can use the application normallyEnd Sub
You can also let users retrieve their Hardware ID so they can send it to you:
Sub ShowMyHardwareID() Dim hwid As String hwid = VBAPL_GetHardwareID() MsgBox "Your Hardware ID is:" & vbCrLf & hwid, vbInformation, "Hardware ID"End SubRebuild the DLL one more time after making these changes, then test by opening the workbook — you should see the activation dialog.
You’re ready to ship. VBA Padlock includes a Distribution dialog to package your files with the correct folder structure.
Click “Distribute” in the ribbon (Project and Build tab)
Choose one of two options:
For this tutorial, select “Create ZIP archive”
Choose a destination and filename (e.g., MyExcelApp_v1.0.zip)
VBA Padlock creates a ZIP containing:
MyExcelApp_v1.0.zip├── MyExcelApp.xlsm└── bin\ ├── MyExcelApprun32.dll ├── MyExcelApprun64.dll └── MyExcelApp.dllInclude this in your distribution (e.g., in a README.txt):
INSTALLATION INSTRUCTIONS=========================
1. Extract all files to a folder on your computer (e.g., C:\MyExcelApp\)
2. IMPORTANT: Keep the folder structure intact. The 'bin' folder must remain   in the same directory as MyExcelApp.xlsm
3. Open MyExcelApp.xlsm in Excel
4. If you see a security warning, click "Enable Content"
5. If prompted, enter your activation key and click "Activate"
6. You're ready to use the application!
IMPORTANT:- Keep MyExcelApp.xlsm and the 'bin' folder together at all times- Do not move or rename files in the 'bin' folder- The 'bin' folder contains 3 DLL files that are required for operationCongratulations! You’ve successfully compiled your Excel VBA code into a protected DLL and wired it up through the VBA Bridge. Your source code is no longer visible in the workbook.
Online Activation
Automate activation with a PHP server so users can activate over the internet.
Trial Mode
Let users try your application before requiring a license key.
License Deactivation
Allow users to transfer their license to a new computer.
Advanced Features
Explore EULA display, localization, and code obfuscation.
Cause: Excel cannot find the DLL files in the bin\ folder.
Solution:
bin\ folder exists in the same directory as MyExcelApp.xlsmbin\ folder contains all three DLL files:
MyExcelApprun32.dllMyExcelApprun64.dllMyExcelApp.dllbin\ folder or any files inside itCause: The activation key does not match the user’s Hardware ID.
Solution:
ShowMyHardwareID macro or call VBAPL_GetHardwareID())Cause: The stored license was deleted (e.g., Windows reinstall, registry cleanup).
Solution: The user needs to reactivate with their existing key. If the hardware has not changed, the same key will work again.
Cause: Excel’s security settings block macros.
Solution: Add the application folder to Excel’s Trusted Locations:
Cause: The return value from VBAPL_Execute is a Variant. If you assign it to a strongly typed variable without conversion, you may get a type mismatch.
Solution: Use CStr(), CDbl(), CLng(), or similar conversion functions when assigning the result to a typed variable, or declare your receiving variable as Variant.
VBAPL_* functions