Key Generation
Generate offline keys for users without Internet.
You’ve protected your VBA application and now you want to automate the activation process. Instead of manually generating keys and emailing them, you can deploy the VBA Padlock Activation Kit — a complete PHP server that handles everything automatically: activation, deactivation, periodic validation, and even a PayPal-powered storefront.
What you’ll set up:
Time needed: 30–45 minutes
The Activation Kit is a full-featured server application:
| Component | Technology | Purpose |
|---|---|---|
| Activation API | PHP 8.1+ / Fat-Free Framework | Handles activation, validation, deactivation requests from VBA Padlock DLLs |
| Web Dashboard | React 18 / TypeScript / Tailwind CSS | Manage clients, licenses, logs, and settings via a modern SPA |
| PayPal Store | PayPal REST API v2 | Optional storefront for selling licenses directly |
| Key Generator | Bundled PHP SDK | Generates compact (HMAC) or full (ECC Ed25519) license keys |
| Extension | Purpose |
|---|---|
pdo_mysql | Database connectivity |
sodium | Ed25519 key generation |
curl | PayPal API and key generation |
openssl | JWT token signing |
json | JSON encoding/decoding |
mbstring | Multi-byte string handling |
Open your VBA Padlock project.
Go to the Licensing Features tab → Online Activation.
Check Enable online activation.
Click Get Activation Kit to download the server files.
Extract the archive. If you don’t plan to customize the dashboard, delete the dashboard-src/ folder before uploading — it contains React source code not needed in production.
Upload the vbapadlock-activkit/ directory to your web server:
https://yourdomain.com/vbapadlock-activkit/Install PHP dependencies via SSH:
cd /path/to/vbapadlock-activkit/inccomposer installOpen inc/config.ini on your server and set your VBA Padlock credentials:
[globals]vbapadlockmasterkey = "YOUR_MASTER_KEY_HERE"vbapadlockpkey = "{YOUR-PRIVATE-KEY-GUID-HERE}"usehardwarelocking = 1| Setting | Where to find in VBA Padlock Studio | config.ini Key |
|---|---|---|
| Master Key | Licensing Features → Advanced Activation → Application Master Key | vbapadlockmasterkey |
| Security Private Key | Licensing Features → Online Activation → Security Private Key | vbapadlockpkey (including braces {...}) |
| Hardware Locking | Licensing Features → Activation Settings → Hardware Locking checkbox | usehardwarelocking (1 = enabled, 0 = disabled) |
To generate cryptographically-signed full-format keys (Ed25519) instead of compact HMAC keys, add your ECC key pair to config.ini:
ecc_private_key = "a1b2c3d4e5f6...your_64_hex_char_private_key..."ecc_public_key = "f6e5d4c3b2a1...your_64_hex_char_public_key..."ecc_private_key_file = "/path/to/project.vbapadlock/ecc_private.key"ecc_public_key_file = "/path/to/project.vbapadlock/ecc_public.pub"Export ECC keys from VBA Padlock Studio: Advanced Activation Options → Copy ECC Keys For PHP Key Generator.
The first time you access the dashboard, a setup wizard guides you through three steps.
Open your browser and go to:
https://yourdomain.com/vbapadlock-activkit/dashboardDatabase Configuration — Enter your MySQL/MariaDB credentials. The wizard tests the connection, creates the required tables, and writes the credentials to config.ini.
Admin Account — Create your dashboard login (name, email, password). A JWT secret is auto-generated.
Application Settings — Set your application name and the default number of activations per license (e.g., 3).
In the Online Activation dialog, set the Base Activation URL:
https://yourdomain.com/vbapadlock-activkit/getactivationClick Test Connection to verify. The server responds with a health-check JSON.
Click Generate next to the Security Private Key if you haven’t already. Copy the GUID and make sure it matches vbapadlockpkey in config.ini.
In the Online Deactivation dialog:
https://yourdomain.com/vbapadlock-activkit/dodeactivation).In the Online Validation dialog:
https://yourdomain.com/vbapadlock-activkit/dovalidation).Compile and publish your project.
Open the protected Office file on a test machine.
The activation dialog appears with an online activation option.
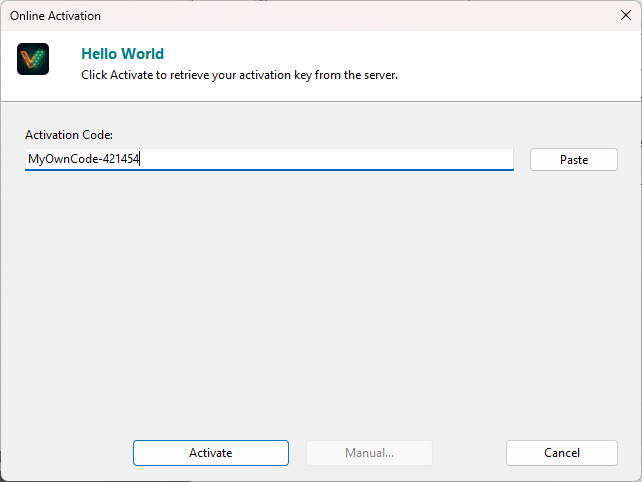
Enter test user details and click Activate.
The server processes the request and returns a license key.
Verify the activation succeeded — check the Logs page in the dashboard.
The web dashboard gives you full control over your activation system.
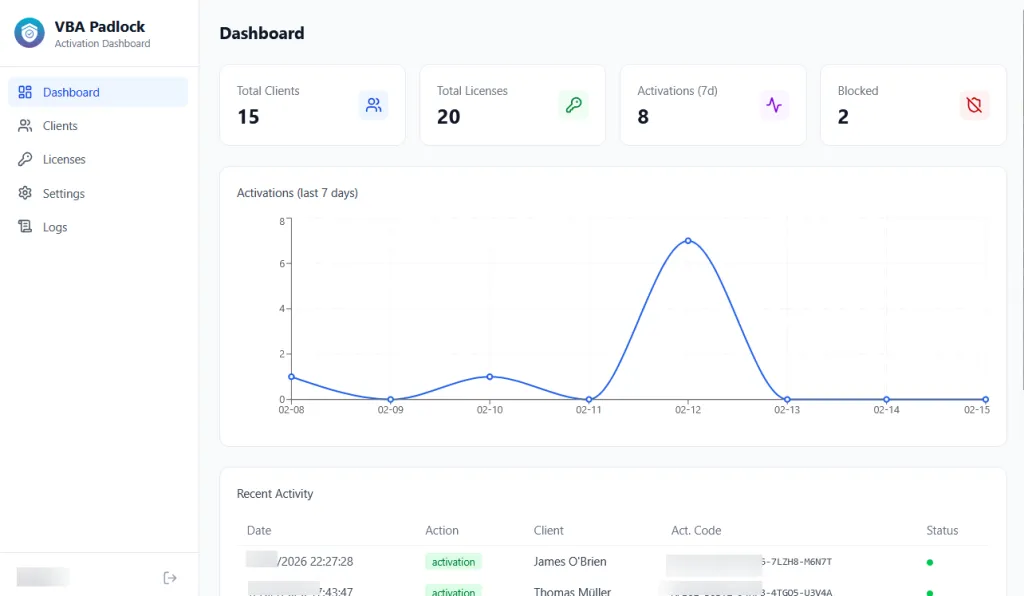
The home page displays four key metrics (total clients, total licenses, blocked licenses, activations this week) and a line chart of daily activations over 7, 30, or 90 days.
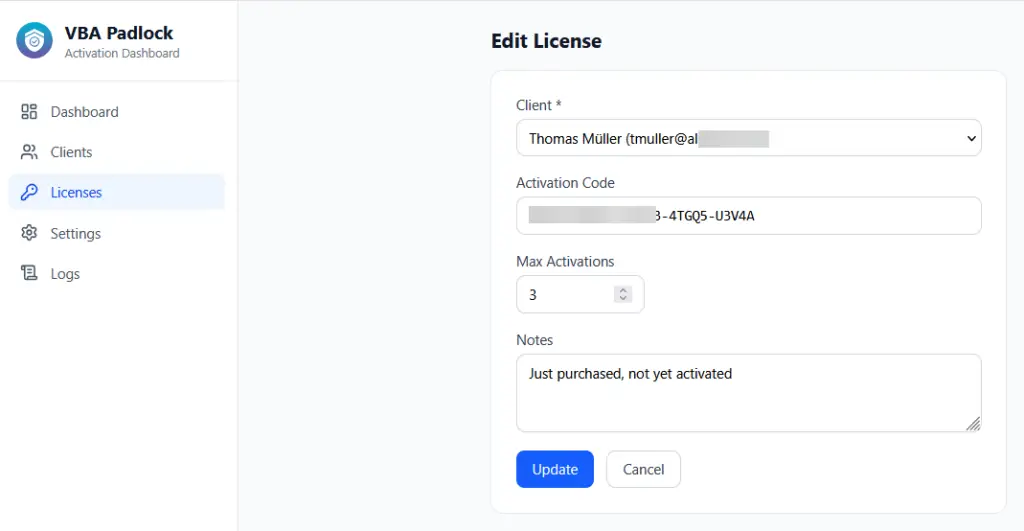
Create, edit, search, and delete customers. Each client can have multiple licenses.
Create licenses with custom or auto-generated activation codes, set max activations, and use quick actions:
A complete audit trail of every activation, validation, and deactivation event, with filtering by action type, status, system ID, and IP address.
The Activation Kit provides three public endpoints used by VBA Padlock DLLs:
| Endpoint | Method | Purpose |
|---|---|---|
/getactivation | POST | Process activation requests — returns a license key and token |
/dovalidation | POST | Validate an active license — checks for revocation via challenge-response |
/dodeactivation | POST | Deactivate a license — frees up an activation slot |
/ or /ping | GET | Health check — returns server status and version |
{ "header": "VBA Padlock Activation", "status": 1, "key": "XXXXX-XXXXX-XXXXX-XXXXX-XXXXX", "token": "sha256_token_for_validation", "username": "John Doe"}| Field | Required | Description |
|---|---|---|
header | Yes | Must contain "VBA Padlock" |
status | Yes | 1 = success, 2 = error |
key | Yes (on success) | The generated license key |
token | Yes (on success) | Unique token for future validation and deactivation |
username | No | Registered user name. When provided, it is stored locally and returned by VBAPL_GetRegisteredName(). |
{ "header": "VBA Padlock Activation", "status": 2, "error": "Maximum number of activations reached"}Understanding the full lifecycle helps you support your customers effectively.
POST /getactivation request with the code, hardware ID, and a SHA256 security checksum.If a user re-activates on the same hardware (same system ID), the server recognizes it and does not consume an additional activation slot. This handles cases like Windows reinstalls or application updates gracefully.
The DLL periodically sends POST /dovalidation requests to verify the license is still valid. The server checks the license exists and is not blocked, then returns a challenge-response to authenticate the exchange.
When a user wants to transfer their license to a new machine:
POST /dodeactivation request.If an activation code is not found in the database, the server still generates an activation key. This ensures the API works even before you create licenses in the dashboard. In this mode, there is no activation limit enforcement. To enable full tracking, create a license in the dashboard matching the activation code you distribute to customers.
The kit includes a public store page where customers can purchase licenses via PayPal.
In the dashboard, go to Settings → PayPal.
Set Mode to sandbox (for testing) or live (for production).
Enter your PayPal Client ID and Client Secret (from the PayPal Developer Dashboard).
Set the Price and Currency (e.g., 49.99 / USD).
Toggle Store Enabled to on.
The store is available at:
https://yourdomain.com/vbapadlock-activkit/storeThe activation process transmits license keys, hardware IDs, and security checksums. Always serve the kit over HTTPS.
The .htaccess file blocks access to sensitive paths:
/inc/ — PHP source code, config.ini, vendor directory/dashboard-src/ — React source code*.ini, *.log, *.lock, *.md filesVerify after deployment: try to access https://yourdomain.com/vbapadlock-activkit/inc/config.ini in your browser — it should return 403 Forbidden.
All activation requests are verified with SHA256 checksums using salts unique to VBA Padlock. Validation and deactivation use a challenge-response mechanism that prevents replay attacks.
Your license database is a critical business asset. Losing it means losing all customer activation records. Set up automated daily backups:
# Example cron job: daily backup at 2:00 AM, keep 30 days0 2 * * * mysqldump -u dbuser -p'password' vbapadlock_db | gzip > /backups/vbapadlock_$(date +\%Y\%m\%d).sql.gzAlso back up inc/config.ini — it contains your JWT secret, ECC keys, and database credentials.
Before going live, verify:
vbapadlockmasterkey matches VBA Padlock Studio projectvbapadlockpkey matches VBA Padlock Studio (including braces)usehardwarelocking set correctly (0 or 1)DEBUG = 0 in config.ini.htaccess active (test: /inc/config.ini returns 403)POST /api/setup/database returns 403)config.ini set to read-only| Error | Cause | Solution |
|---|---|---|
| ”Security validation failed” | vbapadlockpkey mismatch between config.ini and VBA Padlock Studio | Copy the exact GUID from the Studio, including braces {...} |
| ”Maximum number of activations reached” | License has 0 remaining activations | In the dashboard, click Reset Activations on the license |
| ”License is blocked” | License was manually blocked | In the dashboard, click Unblock on the license |
| Activation succeeds but not tracked | Activation code not in database | Create a license in the dashboard with the same key |
| Problem | Cause | Solution |
|---|---|---|
| HTTP 404 on endpoints | mod_rewrite not enabled | Enable mod_rewrite in Apache and ensure AllowOverride All is set |
| HTTP 500 | PHP dependencies not installed | Run cd inc && composer install |
| Empty response | PHP version too old | Requires PHP 8.1+ — check with php -v |
| Dashboard blank page | Build output missing | Ensure the dashboard/ directory contains the pre-built SPA files |
| CORS errors in browser | Mixed HTTP/HTTPS | Ensure the dashboard URL and API URL both use HTTPS |
To enable detailed error logging, set DEBUG = 1 in config.ini. Check your PHP error log for:
Key Generation
Generate offline keys for users without Internet.
Online Activation
Detailed configuration reference.
Batch Compilation
Automate builds with CI/CD.
Troubleshooting
Common issues and solutions.